 Spark 9 in Chennai, July 4-5. A 36-hour agentic AI hackathon with 5 enterprise AI tracks!
Home / Blog / Deploying FastAPI on Kubernetes with GitHub Actions and Argo CD
Deploying FastAPI on Kubernetes with GitHub Actions and Argo CD
Pradip Lamichhane


Deploying FastAPI on Kubernetes with GitHub Actions and Argo CD
In this tutorial, we’ll walk through the complete process of containerizing and deploying a production-ready FastAPI application to a Kubernetes cluster with full CI/CD automation using GitHub Actions and Argo CD. The project follows a clean and modular folder structure, separating routes, configurations, and models for better maintainability.
We’ll demonstrate how to:
Dockerize the FastAPI application
Use SQLite with a Persistent Volume to simulate stateful storage
Deploy to a Kubernetes cluster using Helm charts
Automate deployment using GitHub Actions
Set up GitOps deployment with Argo CD
Fast API
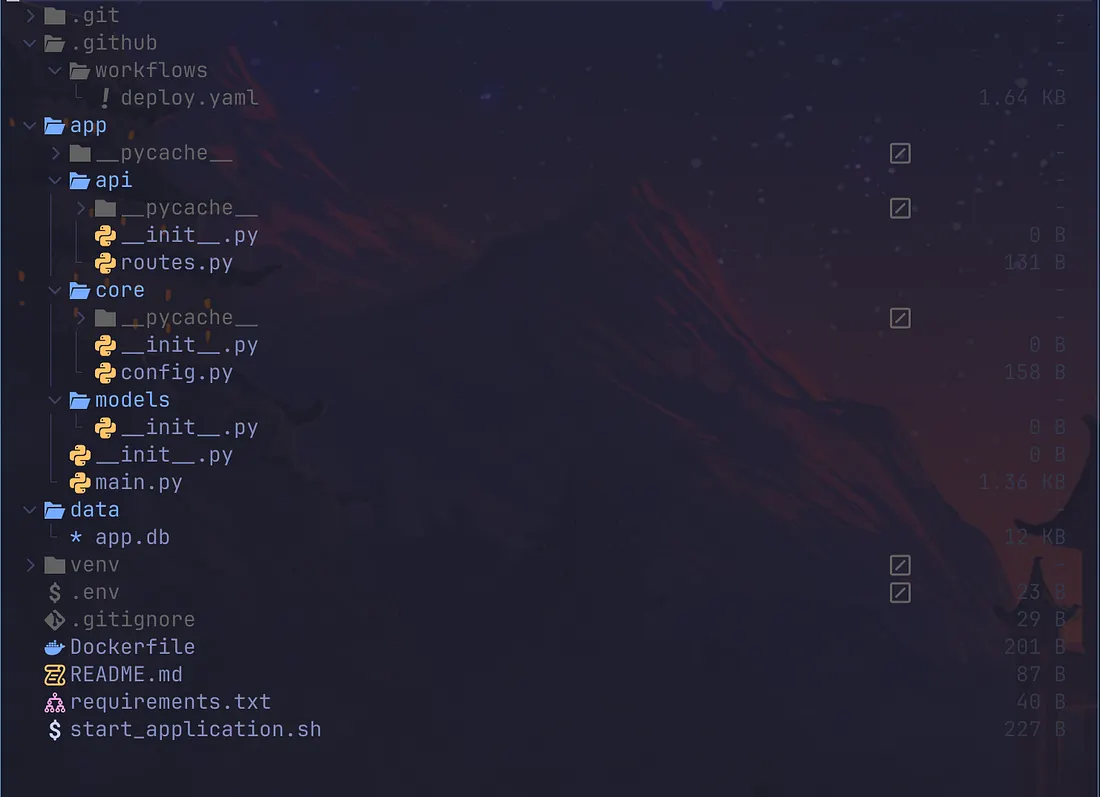
Let’s start with the core FastAPI application. Below is the project structure and key files you’ll need. We’ve organized the app using a modular approach with clearly separated folders for API routes, core configuration, and database models. This makes the codebase easier to manage as it scales.
Press enter or click to view image in full size
#main.py
from fastapi import FastAPI
from app.api.routes import router
app = FastAPI(title="kubernetes")
app.include_router(router)
#routes.py
from fastapi import APIRouter
from fastapi import Query
from app.core.config import settings
import os
import sqlite3
router = APIRouter()
os.makedirs(settings.DB_DIR, exist_ok=True)
@router.get("/health")
def health_check():
return {"status": "healthy"}
@router.get("/")
def read_root():
return {"message": f"Hello from instance {settings.INSTANCE_ID} It's me aman."}
SQLite DB path - must match PVC mount path
Ensure DB directory exists
def get_connection():
print(settings.DB_PATH)
return sqlite3.connect(settings.DB_PATH)
@router.get("/create_table")
def create_table():
conn = get_connection()
cursor = conn.cursor()
cursor.execute("""
CREATE TABLE IF NOT EXISTS people (
id INTEGER PRIMARY KEY AUTOINCREMENT,
name TEXT
)
""")
conn.commit()
conn.close()
return {"message": "Table created"}
@router.get("/insert")
def insert_person(name: str = Query(..., description="Name to insert into table")):
conn = get_connection()
cursor = conn.cursor()
cursor.execute("INSERT INTO people (name) VALUES (?)", (name,))
conn.commit()
conn.close()
return {"message": f"{name} inserted"}
@router.get("/get")
def get_all():
conn = get_connection()
cursor = conn.cursor()
cursor.execute("SELECT * FROM people")
data = cursor.fetchall()
conn.close()
return {"data": data}
# DockerFile
FROM python:3.11-slim
WORKDIR /app
COPY requirements.txt .
RUN pip install --no-cache-dir -r requirements.txt
COPY ./app ./app
CMD ["uvicorn", "app.main:app", "--host", "0.0.0.0", "--port", "80"]
Kubernetes
Kubernetes is powerful for orchestrating containerized apps, but managing multiple YAML files for deployments, services, and configs can become overwhelming. Helm solves this problem by acting as a package manager for Kubernetes allowing us to templatize our manifests into reusable, configurable charts.
One of Helm’s biggest advantages is the use of the values.yaml file. This file acts like a central configuration layer where you define variables such as image tags, replica counts, service ports, and environment-specific values. Instead of hardcoding these details across multiple manifests, you can reference them with simple placeholders like {{ .Values.image.repository }}.
This makes your Kubernetes setup:
Easier to manage across environments (dev, staging, prod)
Cleaner and DRY (Don’t Repeat Yourself)
More maintainable and version-controlled
In this guide, we’ll use Helm to deploy our FastAPI app to Kubernetes, using a well-structured Helm chart and values.yaml to keep things simple, flexible, and production-ready.
Installing kubectl and configuring the aws
brew install kubect
# need to install eksctl to setup nodegroup and all things
brew install eksctl
# to create node group
eksctl create cluster \
--name my-cluster \
--region us-east-1 \
--nodegroup-name standard-workers \
--node-type t3.medium \
--nodes 3 \
--nodes-min 1 \
--nodes-max 4
# for small node-type like small it won't work as there is limit to create a pod for the instances so already there will be default pod so n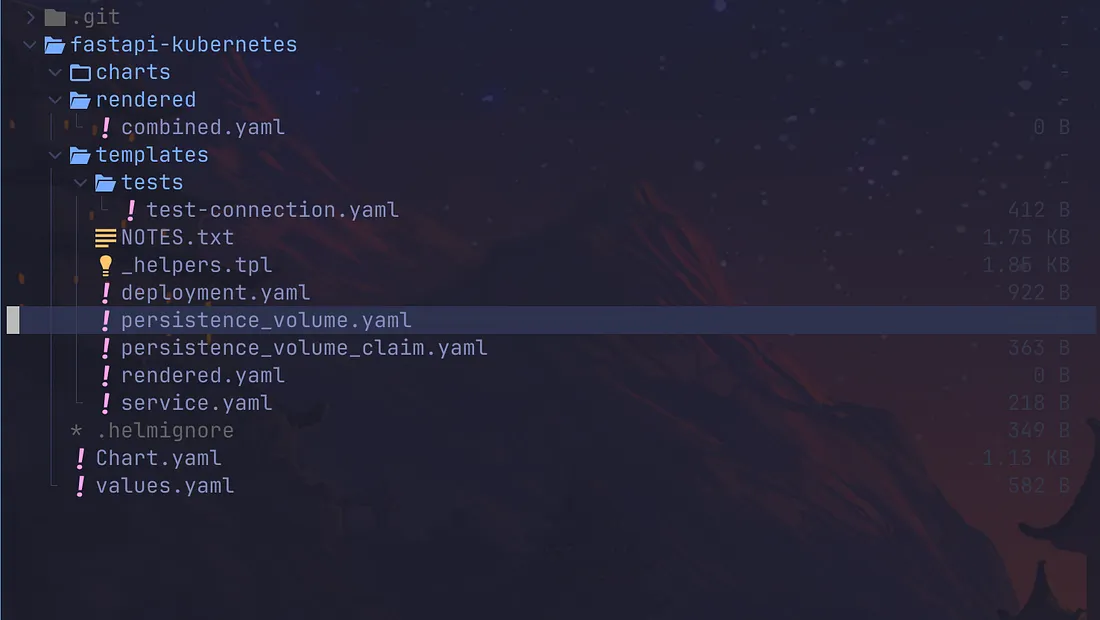 This folder structure will be created automatically with the helm
brew install helm
helm version # Verify the installation
Create a helm chart
This command will create a folder structure of fastapi-kubernetes. in most of it won’t support the _
helm create fastapi-kubernetes.#values.yaml
replicaCount: 1
image:
repository: <ecr_repository_id> # we get this id from aws ecr. we create a new ecr and copy the id
tag: "f2b432ff08f6d42959a7ebe4e48468d7b8b0244c" # docker image tag
pullPolicy: IfNotPresent
service:
type: LoadBalancer
port: 80
ingress:
enabled: false
env:
name: fastapi-app-kubernetes-env
persistence:
enabled: true
pvName: sqlite-pv
size: 1Gi
accessModes:
- ReadWriteMany
storageClassName: efs-sc
volumeHandle: <EFS_id> # We create a new EfS from aws and Replace with your EFS file system ID
mountPath: "/app/data" # Must match path in your FastAPI code
pvcName: sqlite-pvc
# deployment.yaml
apiVersion: apps/v1
kind: Deployment
metadata:
name: {}
spec:
replicas: {}
selector:
matchLabels:
app: {}
template:
metadata:
labels:
app: {}
spec:
containers:
- name: {}
image: "{}:{}"
envFrom:
- configMapRef:
name: {}
imagePullPolicy: {}
ports:
- containerPort: 80
volumeMounts: #this is where the data live
- name: sqlite-storage
mountPath: /app/data
volumes: #Here's how your container accesses the data
- name: sqlite-storage
persistentVolumeClaim:
claimName: sqlite-pvc
imagePullSecrets:
- name: ecr-secret
#service.yaml
apiVersion: v1
kind: Service
metadata:
name: {}
spec:
type: {}
selector:
app: {}
ports:
- port: {}
targetPort: 80
# persistence_volume.yaml
{{- if .Values.persistence.enabled }}
apiVersion: v1
kind: PersistentVolume
metadata:
name: {}
spec:
capacity:
storage: {}
volumeMode: Filesystem
accessModes:
{{- toYaml .Values.persistence.accessModes | nindent 4 }}
persistentVolumeReclaimPolicy: Retain
storageClassName: {}
csi:
driver: efs.csi.aws.com
volumeHandle: {}
{{- end }}
# persistence_volume_claim.yaml
{{- if .Values.persistence.enabled }}
apiVersion: v1
kind: PersistentVolumeClaim
metadata:
name: {}
spec:
accessModes:
{{- toYaml .Values.persistence.accessModes | nindent 4 }}
resources:
requests:
storage: {}
storageClassName: {}
{{- end }}
We will get the issue when connecting EFS from the kubernetes so need to install driver to connect to EFS.
helm repo add aws-efs-csi-driver https://kubernetes-sigs.github.io/aws-efs-csi-driver/
helm repo update
helm upgrade --install aws-efs-csi-driver aws-efs-csi-driver/aws-efs-csi-driver

--namespace kube-system
Deployment:
A Deployment defines how your application runs in the cluster. It manages the lifecycle of your application’s Pods — the smallest deployable units containing your containers.
A Deployment ensures that:
The desired number of pod replicas are running.
Pods are automatically restarted if they fail
Rolling updates happen smoothly without downtime
For example, a Deployment might specify running 3 replicas of your app, ensuring high availability.
Services:
Pods have dynamic IP addresses and can be recreated or rescheduled, which makes direct communication unstable. A Service provides a stable endpoint to access these Pods.
Route traffic to the correct pods using label selectors
Balance load between multiple pod replicas
Expose your application inside the cluster or externally, depending on the service type
How Deployments and Services Work Together
The Deployment creates and maintains your application pods.
The Service exposes those pods to other applications or users through a stable network endpoint.
Persistence Volume:
A PersistentVolume is a piece of storage in the cluster, provisioned either manually by an admin or automatically using a StorageClass. It represents real storage, like an EBS volume or an EFS share.
Think of it as a pre-configured disk that Kubernetes can attach to pods.
Persistence volume claims:
A PersistentVolumeClaim is a request for storage by a user (typically a developer or an application). It specifies the size and access type needed.
Think of it as Hey Kubernetes, I need 5Gi of space with read/write access.
Install chart
This will help to convert this helm into the real kubernetes config this values will be replace by the actual value
helm install fastapi-app ./fastapi-kubernetes
helm install <release name> <path to the Helm chart directory>
Note: If you want to see the YAML before applying it:
This will output the fully rendered YAML (from your Helm chart and values), showing you exactly what would be applied to the cluster if you did run helm install.
helm template fastapi-app ./fastapi-kubernetes
#helm template <release-name> <chart-path>
#The <release-name> is just a label used to name the resources during rendering. It doesn’t require a previous helm install.
helm list # to list the release helm
when updated the helm chart like deployment, service or value or any yamal it need to upgrade to reflect the change
helm upgrade fastapi-app ./fastapi-kubernetes
helm upgrade <release name> <path to the Helm chart directory>
List of commands for kubernetes
kubectl get nodes                   # List all nodes in the cluster
kubectl get pods                    # List all pods in the current namespace
kubectl describe pod <pod-name>    # Show detailed info of a pod
kubectl logs <pod-name>            # View logs from a pod
kubectl logs -f <pod-name>         # Stream logs (follow mode)
kubectl get deployments             # List all deployments
kubectl describe deployment <name> # Describe a specific deployment
kubectl rollout restart deployment <name>   # Restart a deployment
kubectl delete deployment <name>   # Delete a deployment

kubectl get services               # List services in the namespace
kubectl describe svc <name>       # Show details of a service
kubectl port-forward svc/<name> 8000:80  # Forward local port to service
GitHub Actions
Setup the secrets on github to set the gihub secret
Go to your repo → Settings → Secrets and variables → Actions
Click New repository secret
Enter Name (e.g. AWS_ACCESS_KEY_ID)
Enter Value (your secret key)
Click Add secret
name: Build and Deploy
on:
  push:
    branches:
      - main  # or your main branch
jobs:
  build-and-deploy:
    runs-on: ubuntu-latest
    env:
      COMMIT_SHA: ${{ github.sha }}
    steps:
      - name: Checkout code
        uses: actions/checkout@v3
      - name: Configure AWS credentials
        uses: aws-actions/configure-aws-credentials@v2
        with:
          aws-access-key-id: ${{ secrets.AWS_ACCESS_KEY_ID }}
          aws-secret-access-key: ${{ secrets.AWS_SECRET_ACCESS_KEY }}
          aws-region: ${{ secrets.AWS_REGION }}
      - name: Login to Amazon ECR
        id: ecr-login
        uses: aws-actions/amazon-ecr-login@v1
      - name: Build, tag, and push Docker image
        run: |
          docker build -t ${{ secrets.ECR_REPOSITORY }}:$COMMIT_SHA .
          docker push ${{ secrets.ECR_REPOSITORY }}:$COMMIT_SHA
      - name: Checkout Helm chart repository
        uses: actions/checkout@v4
        with:
          repository: pradipL/kubernetes_infra
          token: ${{ secrets.PERSONAL_ACCESS_TOKEN }}
          path: devops-repo
      - name: Update image tag in fastapi-kubernetes Helm chart
        run: |
          cd devops-repo/fastapi-kubernetes
          echo "Before change:"
          # Update the tag field to the current commit SHA
          sed -i "s/^  tag: .*/  tag: \"${COMMIT_SHA}\"/" values.yaml
          echo "Updated tag to $COMMIT_SHA in values file"
          # Commit and push changes
          git config user.name "github-actions"
          git config user.email "github-actions@github.com"
          git add values.yaml
          git commit -m "Update image tag to $COMMIT_SHA"
          git push
Argo CD
Create a name space for argo cd. When we create a namespace, it logically isolates resources within it. Deleting the namespace will remove only the resources contained within that namespace, leaving other parts of the cluster unaffected.
Install argo cd using official manifest
Install argo cd using official manifest and check whether the pod is running or not also check the services to access the argocd from url.
kubectl apply -n argocd -f https://raw.githubusercontent.com/argoproj/argo-cd/stable/manifests/install.yaml
kubectl get pod -n argocd # to get the pod for the argocd we can verify whether the pod is running or not
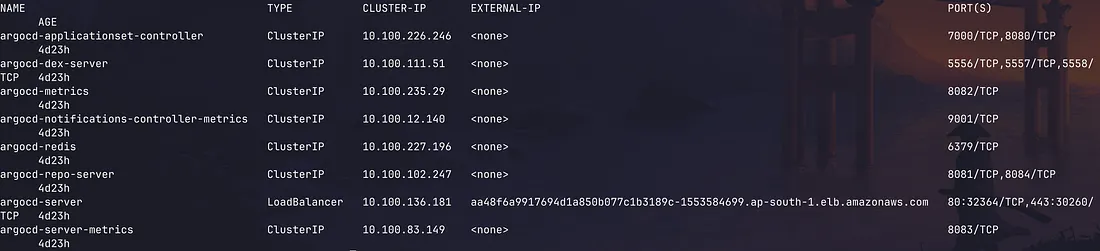
kubectl get services -n argocd # check the service of argocd using below command:
We will see something like below and argocd-server is the one which we can get from the outside we can copy the external-ip in the browser and access the argocd
 Get the initial password for the argocd
kubectl get secret argocd-initial-admin-secret -n argocd -o jsonpath="" | base64 -d
Follow these steps:
Navigate to Settings → Repositories.
Click on “Connect Repo using HTTPS or SSH” — this will open a dialog box.
Fill in the following fields:
Name: A meaningful name for the repository (this can be anything).
Project: Choose the project (typically
default).Repository URL: Enter the URL of your infrastructure Git repository (where your Helm charts or manifests are stored).
4. Click Connect to save the configuration.
Once connected, your repository will appear in the list. Argo CD can now monitor this repository for changes and automatically deploy updates based on your sync settings.
 Once Argo CD is up and running, follow these steps to create a new application from the UI:
Go to Applications → New App.
Fill out the form as follows:
General Configuration
Application Name: Provide a meaningful name for your application.
Project: Leave this as default unless you've created a custom project.
Sync Policy: Choose automatic if you want Argo CD to automatically sync your application whenever changes are detected in the repository.
Source Configuration
Repository URL: Enter the URL of your Git repository that contains the Helm chart (e.g., your infrastructure repo).
Revision: Specify the branch Argo CD should track (e.g., main, dev, etc.).
Path: Provide the path to the Helm chart inside your repository.
In our case, this is fastapi-kubernetes because the helm chart is located inside that folder.
Destination Configuration
Cluster URL: Use https://kubernetes.default.svc/ if you're deploying within the same cluster (this is the default internal Kubernetes cluster endpoint).
Namespace: Set this to default, or any other namespace where you want to deploy your application.
We use default here because our services are running in the default namespace.
Click Create to finish. Argo CD will automatically detect your Helm chart and begin syncing your application.
Connecting the repo in Settings → Repositories gives Argo CD access to your Git repository by storing authentication credentials.
Then, when creating an application, we reuse the same repo URL to tell Argo CD what to deploy — including the branch, path, and sync behavior.


